


As soon as a child is able to sit up and grasp a rattle or a spoon, they are ready to make art! This idea might have you running for the hills, but with a little planning and some experimentation, I think you’ll find that making art with your baby or young toddler can be an activity you enjoy doing together.
Aside from exposing children to a way of expressing themselves, making art at a young age provides a plethora of developmental benefits:
- Builds muscles, eye-hand coordination, and fine motor skills.
- Exercises bi-lateral coordination–using both sides of the body in different ways at the same time.
- Promotes executive function skills–planning and moving through step-by-step processes.
- Exposure to a variety of sensory experiences.
- Boosts spatial awareness.
How do I get started?
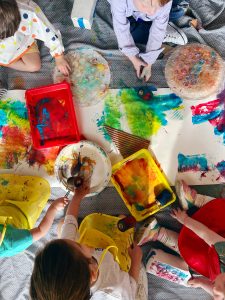
This can be the hardest part. With this age, keep it simple. All those intricate art projects you see on Pinterest? Forget them. You are exposing your child to materials, functions, and sensations they have never experienced before. Prepare your space. Cover the floor with a drop cloth if needed, move other items out of the way, go outside! Do whatever you need to make yourself comfortable in this experience. Constant adjusting due to worries about a mess will make it harder for you and your child to engage in the process. Here are some of my favorite mediums for this age:
- Drawing: Cover an easel, low table, or even a high chair tray with paper and tape it down to secure it. Let your artist draw with jumbo crayons to start. They are mess-free and non-toxic in case they take a bite. If they do take a bite, redirect and show them a different way to use the material. Let them explore by dragging, banging, and tapping their crayon on the page. Let your artist experiment with standing or sitting while drawing. Many children at this age prefer to stand so they can use their whole body. The bigger your paper is, the better! The backs of old wrapping paper or packaging paper are perfect for this.
- Painting: Follow the same process as above. With paint especially, the bigger the surface area you can provide, the better. Offer thick handled paint brushes and sponges and model how to dip them in the paint and then spread them across the page. Offer one color to start, then add in another and see how they experiment with mixing.
- Sculpture: Clay is a wonderful sensory material and also promotes hand strength and dexterity. Prepare your surface with a plastic tray or tape down some wax paper so the clay doesn’t stick. For little ones, Play-Doh is an affordable, accessible option that can be used again and again. I also like air-dry clay for squishing and rolling. Model for your artist how to push, roll, and press into the clay. Offer popsicle sticks, blocks, or forks to experiment with impressions.

What tools should I use?
I always say the best materials to use are the ones you already have, but, if you’re looking for some tried and true recommendation, these are my favorites for our youngest artists.
- Crayola Jumbo Crayons
- IKEA Mala Easel Paper
- Crayola Washable Paint
- Thick Handled Paint Brushes
- Open Trays for Paint or Clay
- Apron (a large old t-shirt works just as well)
- Air Dry Clay
What if I have a taster on my hands?
Luckily, all of the art materials I’ve mentioned are non-toxic. Not that we want our children to be eating clay or paint, but if they taste a little I find it deters them for the next time. If you are looking for a more taste safe option, see these recipes below for paint and salt dough.
Taste Safe Paint
Add 1⁄4 cup of salt, 1⁄2 cup of flour, and 1⁄2 cup of water into a bowl and mix. Bake the flour at 300 degrees for 10 minutes beforehand to make it edible for young children. Add more or less water depending on desired consistency. Separate into as many bowls or containers as colors you plan to make. Add a few drops of food coloring* to each bowl or container and blend well. Paint will keep in the refrigerator for six months.
*Warning: Food coloring will stain surfaces and clothing.
Salt Dough
To create salt dough, combine 1⁄2 cup of flour and 1⁄4 cup of salt together in a bowl. Bake the flour at 300 degrees for 10 minutes beforehand to make it edible for young children. Mix to combine. Slowly add 1⁄4 cup of water and mix together. Knead with your hands until a smooth dough forms. If you would like to use color, add a few drops of food coloring* or powdered Kool-Aid or Jell-O to all or part of your dough and knead until the dough changes color.
*Warning: Food coloring will stain surfaces and clothing.


