


Here’s a favorite cookie recipe for National Sugar Cookie Day!
Baking sugar cookies is a favorite family activity for us, and not just because I’m a baker at heart. For us, it represents creativity, tradition, and usually a special event. I also love that everyone gets their own cookies to work on and express themselves, without the usual battle between siblings.
Do decorated sugar cookies sound overwhelming to you? If you lean into the mess, knowing it will all get cleaned up when you’re done, it is really not that bad! Below are different levels of sugar cookie fun, depending on your skills and interest.
First, let’s start with a sugar cookie recipe. Keep in mind that many sugar cookie recipes require that you refrigerate the dough, so they do not spread too much in the oven. This recipe does not require that!
Ingredients: (Makes about 24 cookies)
1 cup butter, room temperature
1 cup granulated white sugar
1 teaspoon vanilla extract
½ teaspoon almond extract (optional)
1 egg, beaten and at room temperature
2 teaspoons baking powder
1 teaspoon salt
3 cups all-purpose flour, sifted or spooned into the measuring cup
Directions:
Preheat oven to 350 degrees Fahrenheit.
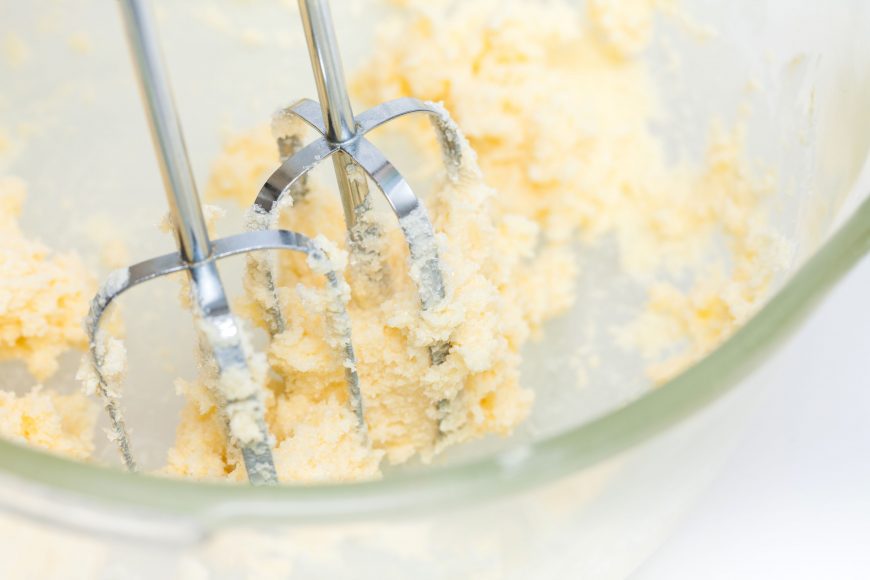
Cream butter and sugar together until light and fluffy (use your mixer or hand mixer if you have one!).
Add extract(s) and egg.
Add 3 cups of flour/baking powder/salt altogether, mixing slowly so it does not spill.
Add last cup of flour mixed with baking powder and salt.
Mix until dough comes together and starts pulling away from the bowl.
Break dough into pieces to roll out on a lightly floured surface (e.g., countertop). Use cookie cutters to cut out shapes, moving the cutter back and forth a bit if needed. Try to make your cookies about ¼ inch thick (see tips below).
Place shapes on a cookie sheet lined with parchment paper or a silicone mat. Using a spatula to move them can help!
Bake for 6-8 minutes. Check to see if they are starting to firm up before they get golden for a softer cookie. They will continue to cook on your cookie sheet when you take them out. They may take up to 10 minutes so keep your eye out!
Tips:
- Be careful not to overmix or add too much flour, which will make the cookies tougher and drier. My kids love to add extra flour to the counter, so it can be helpful to put some in a small dish to limit their access.
- Any cookie cutters will do. You may even find new ways to use old shapes! For example, a flower might become a sun! Round biscuit cutters have endless possibilities.
- Cookie dough is very forgiving. Mess up? Smush it back into the pile and try again!
- If your dough is getting warm and hard to shape, pop it in the fridge for 15-30 minutes.
- To get evenly baked cookies, roll them out to the same thickness. I have a rolling pin with spacers on the side, so I know how thick it is. You could also use rubber bands.
- Let the cookies cool completely before decorating.
- For decorating, put toppings in an ice cube tray for the kiddos so they can have variety but don’t spill big bottles all over the floor. Use a paper plate with sides or a cookie sheet for them to decorate on to catch some mess.
- Consider making your frosting colors ahead of time.
- These cookies are excellent to freeze!
Now it’s time to decorate!
Beginners / Kiddos:
Use a small baking spatula or knife to spread the frosting on the cookie and decorate with sprinkles, candy, or other treats! Make a face out of marshmallows, chocolate chips, and gummies smiles, for example. Or make cookie sandwiches with frosting or ice cream between 2 of the same shapes.
Intermediate:
Snip the end off of sandwich baggies and fill with each color. Consider using a rubber band at the other end of the bag, so the frosting doesn’t smush out. Tidy lines back and forth for each design makes a very attractive cookie!
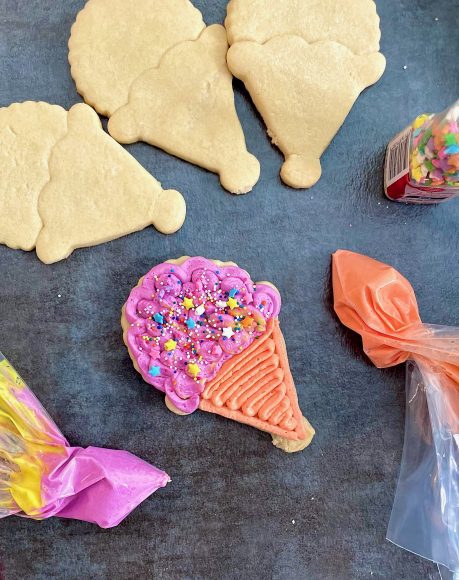
Advanced:
Use pastry bags and piping tips to make your designs! Or try royal icing!

Keep in mind: the cookies will be delicious no matter how they look. And the kids/you will have fun no matter how the kitchen looks at the end.


